Before you engage on a bigger project, there are a few things you must do to avoid disappointments.

One of them is EXERCISE, yes sewing exercises are key to give your projects a professional look. See below a few tips on how to develop your skills prior to start!
Believe me, preparation is very important! Most novice sewers give up due to skipping this step.
Ok, so few things before you start the fabric cutting:
- Fabric should suit your pattern (you can’t use a chiffon light weight fabric to make a coat!); usually commercial patterns recommend what kind of fabric you have to buy.
- Pattern to use. You can buy a commercial pattern or make yours. To make your own pattern a dress dummy is essential, unless you can draft your patterns from your previous clothes (see our post for pattern making). It must fit your measures; prior to lay the pattern on the fabric, make sure it fits you perfectly (see pattern making measures).
Ok, so after making sure you got the right pattern (for you), a gorgeous fabric to go with it and have cut it, I strongly recommend that you test your sewing maneuvering skills. You then can try the following:
- Get scrap fabrics and draw straight lines on it with a ruler and a pencil and/or if you’ve striped scrap fabrics you can follow the straight line list.
- Then sew with different thread colour till you see that you can sew on a straight line!
- For corners and round stitches, draw squares and circles and follow the line till you’re confident.
That will help you to stitch uniformly along the edge of the fabric and thus not change the size of your clothes because the stitches were all over the place, without mentioning that you’d have to break the stitches and sew it again.
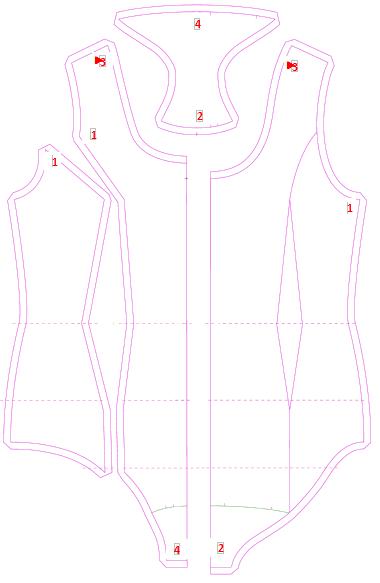
Another important tip for when you finish cutting the pattern on the fabric is to not separate them till you finish cutting all patterns pieces, as you might not be used to the garments’ parts, such as front, back, sleeves, cuff, etc., keep them pinned down for the time been. You can also write with a non-permanent pen marker for fabric on the wrong side of it, marking the numbers on the top corners (where they’ll be joint) or of the fabric pattern pieces (front part, back part, sleeve…).
An example: (Please click on the picture to enlarge)
So, all pattern pieces are cut and you’ve added the numbers, next step is to try it on. If you have a dress dummy it is easier to pin down the pattern together (as if you’re going to stitch along the edges) and put on the dummy to check the fitting (see our post on how to create your own dress dummy!).
If you don’t have, try it on yourself. You might want a friend’s help if you want to adjust size or length as it is a bit hard to do on your own and it rarely comes out the way you want.
Happy with the results? Time to sew! Do not undo the pins; they’ll help you remember what piece needs to go together!
If you follow the basic rules, you’re half way towards your target!!


